Vim là một trình editor được sử dụng rộng rãi ở các hệ điều hành nhân Unix như Linux hay mac. Nó được viết bởi Bram Moolennaar dựa trên các mã nguồn mở và được phát hành lần đầu vào năm 1991. Nó được thiết kế để sử dụng có command-line để viết code, và gần như người viết không còn sử dụng đến chuột máy tính(Hãy quên nó đi là vừa). Vim hổ trọ cho rất nhiều ngôn ngữ lập trình phổ biến.
Link download WINXP/7/8/8.1 - Office 2003/2007/2010/2013 original Fshare.vn, 4share.vn
Tổng hợp link tải về WINXP/7/8/8.1- Office 2003/2007/2010/2013 NGUYÊN GỐC Fshare.vn, 4share.vn Link download WINXP/7/8/8.1 - Office 2003/2007/2010/2013 original Fshare.vn, 4share.vn
Những việc cần làm sau khi cài đặt kali linux-Things to do after installing Kali Linux
Kali linux là hệ điều hành chứa những bộ công cụ cực kì hữu dụng cho việc penetration testing, nhiều bạn mới làm quen với backtrack/kali cảm thấy bỡ ngỡ và mong muốn làm sao để nó có thể trở thành một hệ điều hành chính có thể thay thế windows để tiện cho việc học tập giải trí và nghiên cứu hacking, dưới đây mình tổng hợp một số phần mềm cần thiết và cách cài sau khi cài đặt kali, hi vọng sẽ giúp ích cho các bạn.
Chọn windows là hệ điều hành mặc định khi khởi động thay vì ubuntu/linux(dual boot) Set windows is default when starting
Nhiều bạn khi cài song song windows/ linux thì mặc định linux sẽ được boot trước, nếu muốn khởi động vào windows thì phải chọn ở trên bàn phím, việc làm này làm mất thời gian của nhiều bạn vốn chỉ xem linux là hdh để vooc và windows vẫn là hdh chính sử dụng, hướng dẫn sau sẽ giúp bạn đặt windows là hdh mặc định khi khởi động.
Cách add một khóa REG_NONE vào registry
Đôi khi bạn cần add một REG_NONE vào registry nhưng Bat không hỗ trợ kiểu NONE thông qua lệnh REG ADD vì vậy mình sẽ hướng dẫn các bạn một cách "lách luật" đó là chúng ta sẽ tạo ra một file reg sau đó import nó.
Khi chạy một ứng dụng từ máy ảo trong Eclipse, mặc dù đã build thành công trước đó nhưng bạn vẫn gặp lỗi khó chịu "Unable to execute dex: java.nio.BufferOverflowException. Check the Eclipse log for stack trace". Sau đây là cách khắc phục:
Bưới 1: Chuột phải vào Project, chọn properties
Bước 2: Chọn mục Java Build Path
Bước 3: Tại tab Libraries, chọn mục Android Dependencies, sau đó, click Remove
Bước 4: Click OK để hoàn thành.
Xem hình sau:
Mình tình cờ biết được trang web này khi đang chém gió với một số anh em vn-zoom, các bạn chỉ cần truy cập vào http://web.archive.org/ sau đó gõ địa chỉ trang web cần xem ở quá khứ rồi nhấn Browse History, sau đó các bạn có thể chọn thời gian xem mà mình cần.
Chúc các bạn thành công.
Phiên bản sdk mới nhất đến hiện tại là Revision 24.3.3 nhưng trong các sách hay các tutorial dạy android thì thường dùng các phiên bản cũ hơn. Các phiên bản này có sự khác nhau khiến cho người học cảm thấy khó khăn khi tiếp cận, vì vậy mình sẽ hướng dẫn các bạn cách tải bản cũ của adroid sdk tool.
Đầu tiên bạn vào trang này https://developer.android.com/tools/sdk/tools-notes.html sau đó các bạn nhìn mục Revisions nó sẽ hiện các phiên bản, ví dụ như
SDK Tools, Revision 24.3.3 (June 2015)
SDK Tools, Revision 24.3.2 (June 2015)
SDK Tools, Revision 24.3.1 (June 2015)
Sau đó các bạn thay đổi link sau
http://dl-ssl.google.com/android/repository/tools_rXXX-windows.zip
http://dl-ssl.google.com/android/repository/tools_rXXX-linux.zip
http://dl-ssl.google.com/android/repository/tools_rXXX-macosx.zip
VPN service Hola, which has millions of users, recently came under fire for not being as up front with their users as they should have been. In the past weeks it has been revealed that Hola does the following:
allows Hola users to use each others’ bandwidth
sells their users’ bandwidth to their sister company Luminati (which recently helped facilitate a botnet attack)
and, according to Vectra research, Hola can install and run code and additional software on their users’ devices without their users’ knowledge.
If you are an Hola user or if you know someone who uses Hola, please make sure you/they are aware of this.
The service, which can be downloaded either as an app or as a browser extension, is a peer-to-peer network that allows people to use other Hola users’ bandwidth to anonymize their browsing activities and to circumvent geo-restricted content.
What many users did not realize is that they were essentially exit nodes and other Hola users could use their bandwidth to carry out illegal activity, like accessing child pornography.
Additionally, Hola sells its users’ bandwidth to its sister company, Luminati. Prior to the end of May, Hola did not mention Luminati on its website. Luminati’s premium service, which was originally advertised as being an anonymization network, uses Hola’s users as nodes to redirect traffic through. Hola’s connection to Luminati was exposed after a Luminati client launched a DDOS attack on 8chan, using Hola’s network (users) as a botnet. Researchers at Vectra, a security company that identifies cyber attacks, dug a little deeper and discovered that Hola can also download and install additional software without the user’s knowledge and can install and run code without the user’s knowledge as well. Furthermore, Vectra found that Hola contains a built in console, “zconsole”. Zconsole allows direct human interaction with an Hola node even when Hola is not being actively used by a user. With access to the console an attacker could, as Vectra points out, “accomplish almost anything” and launch a large and targeted attack. What we can learn from this
There is one main lesson people should learn from the Hola situation: research the products you download and use.
What many people may not have been aware of in this situation was how their bandwidth could be abused by fellow Hola users and how much control Hola had. A VPN helps you to anonymize all of your browsing activities – and to access content in geo-restricted regions by redirecting it through other servers. This can, for example, be useful if you travel or live abroad and want to access content from your home country. What you should research before choosing a VPN service
Before deciding which VPN service to use, research the VPN provider and make sure the provider you choose is trustworthy. Find out what methods they use. If they use servers to redirect traffic through, make sure you know who owns the servers, what they do with the data that flows through the servers and whether or not they keep your data or sell it to third parties.
Avast for example, offers free antivirus, but our Avast SecureLine VPN is a premium service. We charge for our VPN services, because we pay extra to own and maintain servers around the world to redirect traffic through. We do not log the data that flows via our VPN services. Know how much control your VPN service really has Hola is available as an app and browser extension and as mentioned above, Vectra found that Hola is able to do a lot more than just redirect your traffic. Hola can download and run additional code through your browser, without your knowledge. Of course a VPN service is always going to have access to your personal data (otherwise it wouldn’t work). However, even if they don’t provide a VPN feature, browser extensions have immense control over your browser that most users may not be fully aware of.
“Browser extensions can see everything you see in your browser, as well as everything you type in your browser, including passwords. Untrustworthy browser extension vendors can easily misuse this data and it is therefore extremely important that users be careful when choosing which browser extensions to install. On top of that, browser extensions can also manipulate search results and slow down your browser.” Thomas Salomon, head of Browser Cleanup product development at Avast.
What you should do before downloading a browser extension
When deciding on whether or not you should download a browser extension, you should also first make sure the extension comes from a reliable and trusted source, read both professional and user reviews about the extension and read the extensions terms and conditions before downloading it. What you should do if you have a bad extension installed on your browser If you are worried that you may have malicious extensions (they are often added when installing an otherwise legitimate program without you even noticing) installed on your browser or have an extension that is difficult to remove, you should run Avast Browser Cleanup. Avast Browser Cleanup is a tool that removes malicious and poorly rated add-ons and restores your browser to its initial and clean state. Avast Browser Cleanup is included in Avast and is now also available as a stand-alone product. Keeping your browsing safe
Our browsing information is extremely valuable: we bank online, keep in touch with our loved ones via email and social media, search for everything under the sun on the Internet. Piece all this information together and you have someone’s complete identity, not something you want to hand over to just anyone.
VPNs and browser extensions, like Hola, become dangerous the minute they abuse their power, without openly informing their users of what they are doing. It is therefore vital that you are aware of what software you have installed on your computer and what extensions you have installed on your browser to keep your private information private.
ADDUSERS Add or list users to/from a CSV file
ADmodcmd Active Directory Bulk Modify
ARP Address Resolution Protocol
ASSOC Change file extension associations•
ASSOCIAT One step file association
ATSchedule a command to run at a specific timeATTRIB Change file attributes
b
BCDBOOT Create or repair a system partition
BCDEDIT Manage Boot Configuration Data
BITSADMIN Background Intelligent Transfer Service
BOOTCFG Edit Windows boot settings
BROWSTAT Get domain, browser and PDC info
c
CACLS Change file permissions
CALL Call one batch program from another•
CERTREQ Request certificate from a certification authority
CERTUTIL Utility for certification authority (CA) files and services
CD Change Directory - move to a specific Folder•
CHANGE Change Terminal Server Session properties
CHKDSK Check Disk - check and repair disk problems
CHKNTFS Check the NTFS file system
CHOICE Accept keyboard input to a batch file
CIPHER Encrypt or Decrypt files/folders
CleanMgr Automated cleanup of Temp files, recycle bin
CLIP Copy STDIN to the Windows clipboard
CLS Clear the screen•
CMD Start a new CMD shell
CMDKEY Manage stored usernames/passwords
COLOR Change colors of the CMD window•
COMP Compare the contents of two files or sets of files
COMPACT Compress files or folders on an NTFS partition
COMPRESS Compress one or more files
CONVERT Convert a FAT drive to NTFS
COPY Copy one or more files to another location•
Coreinfo Show the mapping between logical & physical processors
CSCcmd Client-side caching (Offline Files)
CSVDE Import or Export Active Directory data
d
DATE Display or set the date•
DEFRAG Defragment hard drive
DEL Delete one or more files•
DELPROF Delete user profiles
DELTREE Delete a folder and all subfolders
DevCon Device Manager Command Line Utility
DIR Display a list of files and folders•
DIRQUOTA File Server Resource Manager Disk quotas
DIRUSE Display disk usage
DISKPART Disk Administration
DISKSHADOW Volume Shadow Copy Service
DISKUSE Show the space used in folders
DOSKEY Edit command line, recall commands, and create macros
DriverQuery Display installed device drivers
DSACLs Active Directory ACLs
DSAdd Add items to active directory (usergroupcomputer)
DSGet View items in active directory (usergroupcomputer)
DSQuery Search for items in active directory (usergroupcomputer)
DSMod Modify items in active directory (usergroupcomputer)
DSMove Move an Active directory Object
DSRM Remove items from Active Directory
e
ECHO Display message on screen•
ENDLOCAL End localisation of environment changes in a batch file•
ERASE Delete one or more files•
EVENTCREATE Add a message to the Windows event log
EXIT Quit the current script/routine and set an errorlevel•
EXPAND Uncompress CAB files
EXTRACT Uncompress CAB files
f
FC Compare two files
FIND Search for a text string in a file
FINDSTR Search for strings in files
FOR /F Loop command: against a set of files•
FOR /F Loop command: against the results of another command•
FOR Loop command: all options Files, Directory, List•
FORFILES Batch process multiple files
FORMAT Format a disk
FREEDISK Check free disk space
FSUTIL File and Volume utilities
FTP File Transfer Protocol
FTYPE File extension file type associations•
g
GETMAC Display the Media Access Control (MAC) address
GOTO Direct a batch program to jump to a labelled line•
GPRESULT Display Resultant Set of Policy information
GPUPDATE Update Group Policy settings
h
HELP Online Help
HOSTNAME Display the host name of the computer
i
iCACLS Change file and folder permissions
IEXPRESS Create a self extracting ZIP file archive
IF Conditionally perform a command•
IFMEMBER Is the current user a member of a group
IPCONFIG Configure IP
INUSE Replace files that are in use by the OS
l
LABEL Edit a disk label
LODCTR Load PerfMon performance counters
LOGMAN Manage Performance Monitor logs
LOGOFF Log a user off
LOGTIME Log the date and time in a file
m
MAKECAB Create .CAB files
MAPISEND Send email from the command line
MBSAcli Baseline Security Analyzer
MEM Display memory usage
MD Create new folders•
MKLINK Create a symbolic link (linkd) •
MODE Configure a system device COM/LPT/CON
MORE Display output, one screen at a time
MOUNTVOL Manage a volume mount point
MOVE Move files from one folder to another•
MOVEUSER Move a user from one domain to another
MSG Send a message
MSIEXEC Microsoft Windows Installer
MSINFO32 System Information
MSTSC Terminal Server Connection (Remote Desktop Protocol)
n
NET Manage network resources
NETDOM Domain Manager
NETSH Configure Network Interfaces, Windows Firewall & Remote access
NBTSTAT Display networking statistics (NetBIOS over TCP/IP)
NETSTAT Display networking statistics (TCP/IP)
NLSINFO Display locale information (reskit).
NLTEST Network Location Test (AD)
NOW Display the current Date and Time
NSLOOKUP Name server lookup
NTBACKUP Backup folders to tape
NTDSUtil Active Directory Domain Services management
NTRIGHTS Edit user account rights
NVSPBIND Modify network bindings
o
OPENFILES Query or display open files
p
PATH Display or set a search path for executable files•
PATHPING Trace route plus network latency and packet loss
PAUSE Suspend processing of a batch file and display a message•
PERMS Show permissions for a user
PERFMON Performance Monitor
PING Test a network connection
POPD Return to a previous directory saved by PUSHD•
PORTQRY Display the status of ports and services
POWERCFG Configure power settings
PRINT Print a text file
PRINTBRM Print queue Backup/Recovery
PRNCNFG Configure or rename a printer
PRNMNGR Add, delete, list printers and printer connections
ProcDump Monitor an application for CPU spikes
PROMPT Change the command prompt•
PsExec Execute process remotely
PsFile Show files opened remotely
PsGetSid Display the SID of a computer or a user
PsInfo List information about a system
PsKill Kill processes by name or process ID
PsList List detailed information about processes
PsLoggedOn Who's logged on (locally or via resource sharing)
PsLogList Event log records
PsPasswd Change account password
PsPing Measure network performance
PsService View and control services
PsShutdown Shutdown or reboot a computer
PsSuspend Suspend processes
PUSHD Save and then change the current directory•
q
QGREP Search file(s) for lines that match a given pattern
Query Process / QPROCESS Display processes
Query Session / QWinsta Display all sessions (TS/Remote Desktop)
Query TermServer /QAppSrv List all servers (TS/Remote Desktop)
Query User / QUSER Display user sessions (TS/Remote Desktop)
r
RASDIAL Manage RAS connections
RASPHONE Manage RAS connections
RECOVER Recover a damaged file from a defective disk
REG Registry: Read, Set, Export, Delete keys and values
REGEDIT Import or export registry settings
REGSVR32 Register or unregister a DLL
REGINI Change Registry Permissions
REM Record comments (remarks) in a batch file•
REN Rename a file or files•
REPLACE Replace or update one file with another
Reset Session Delete a Remote Desktop Session
RD Delete folder(s)•
RMTSHARE Share a folder or a printer
ROBOCOPY Robust File and Folder Copy
ROUTE Manipulate network routing tables
RUNStart | RUN commands
RUNAS Execute a program under a different user account
RUNDLL32 Run a DLL command (add/remove print connections)
s
SC Service Control
SCHTASKS Schedule a command to run at a specific time
SET Display, set, or remove session environment variables•
SETLOCAL Control the visibility of environment variables•
SetSPN Edit Service Principal Names
SETX Set environment variables
SFC System File Checker
SHARE List or edit a file share or print share
ShellRunAs Run a command under a different user account
SHIFT Shift the position of batch file parameters•
SHORTCUT Create a windows shortcut (.LNK file)
SHUTDOWN Shutdown the computer
SLEEP Wait for x seconds
SLMGR Software Licensing Management (Vista/2008)
SORT Sort input
START Start a program, command or batch file•
STRINGS Search for ANSI and UNICODE strings in binary files
SUBINACL Edit file and folder Permissions, Ownership and Domain
SUBST Associate a path with a drive letter
SYSMON Monitor and log system activity to the Windows event log
SYSTEMINFO List system configuration
t
TAKEOWN Take ownership of a file
TASKLIST List running applications and services
TASKKILL End a running process
TELNET Communicate with another host using the TELNET protocol
TIME Display or set the system time•
TIMEOUT Delay processing of a batch file
TITLE Set the window title for a CMD.EXE session•
TLIST Task list with full path
TOUCH Change file timestamps
TRACERT Trace route to a remote host
TREE Graphical display of folder structure
TSDISCON Disconnect a Remote Desktop Session
TSKILL End a running process
TSSHUTDN Remotely shut down or reboot a terminal server
TYPE Display the contents of a text file•
TypePerf Write performance data to a log file
TZUTIL Time Zone Utility
v
VER Display version information•
VERIFY Verify that files have been saved•
VOL Display a disk label•
w
W32TM Time Service
WAITFOR Wait for or send a signal
WEVTUTIL Clear event logs, enable/disable/query logs
WHERE Locate and display files in a directory tree
WHOAMI Output the current UserName and domain
WINDIFF Compare the contents of two files or sets of files
WINRM Windows Remote Management
WINRS Windows Remote Shell
WMIC WMI Commands
WUAUCLT Windows Update
x
XCACLS Change file and folder permissions
XCOPY Copy files and folders
:: Comment / Remark•
Đôi khi bạn cần add một REG_NONE vào registry nhưng Bat không hỗ trợ kiểu NONE thông qua lệnh REG ADD vì vậy mình sẽ hướng dẫn các bạn một cách "lách luật" đó là chúng ta sẽ tạo ra một file reg sau đó import nó.
Code:
call :regnone HKEY_CURRENT_USER "keyname" valuename

goto :eof

:regnone
rem create a reg file
echo Windows Registry Editor Version 5.00 > none.reg
echo [%~1\%~2] >> none.reg
echo "%~3"=hex(0): >> none.reg

rem import it the registry
reg import none.reg

del /q none.reg

goto :eof
Cài đặt Windows là một trong kỹ năng không thể thiếu với người dùng máy tính, nhưng không phải ai cũng biết cách cài windows từ ổ cứng mà không cần sử dụng USB hay đĩa CD nhưng hiệu quả tương tự như khi dùng đĩa CD và USB: xóa hoàn toàn windows cũ, format và phân chia ổ đĩa dễ dàng. Nếu các bạn có sắn USB thì cũng có thể thực hiện theo hướng dẫn cài windows 7 bằng USB hoặc hướng dẫn cài windows 8.1 bằng USB.
Các phần trong bài viết:
Không tốn tiền mua USB hay CD. Mình thích nhất ưu điểm này :))
Tốc độ cài nhanh gấp 4 lầ CD và nhanh hơn USB do file được lưu trên máy tính thời gian sao chép file nhanh hơn từ USB hay CD vào máy tính.
Không cần dùng USB, CD nên cực kỳ tiện lợi, dù máy tính bạn không có ổ cắm CD hay USB cũng thực hiện được.
Điều kiện để có thể cài đặt
Hệ điều hành trên máy tính là Windows ( XP, 7, 8 ) và phải vẫn chạy bình thường. Hệ điều hành cài mới phải có cùng số bit với hệ điều hành đang sử dụng. Nghĩa là nếu bạn đang dùng windows 32 bít (x86) thì bạn phải cài hệ điều hành mới là 32 bit (x86) , hoặc nếu bạn đang dùng Windows 64 bit (x64) thì bạn phải cài hệ điều hành mới là windows 64 bit (x64).
Nếu không vào được hệ điều hành hoặc bạn muốn cài hệ điều hành mới có số bit khác hệ điều hành đang sử dụng thì bạn có thể cài đặt windows bằng USB cho windows 7 hoặc windows 8.1 mới.
Máy tính của bạn có ít nhất 2 ổ đĩa bao gồm cả ổ đĩa chứa HĐH đang sử dụng.
Chuẩn bị trước khi cài đặt
Tải file .ISO cài Windows 7 hoặc file .ISO cài Windows 8.1 (bạn có thể chọn một bản Windows 7, 8.1 32 bit hoặc 64 bit bất kỳ). Nếu Ram máy tính bạn từ 4GB trở lên thì bạn nên cài bản 64bit (x64), thấp hơn thì nên cài bản 32 bit (x86).
Cài sẵn phần mềm giải nén Winrar hoặc 7-zip. Nếu chưa có các bạn có thể download 7-Zip về cài đặt cho máy tính.
Hướng dẫn cài đặt Windows 7, 8 từ ổ cứng bằng Video
Hướng dẫn cài đặt Windows 7, 8 từ ổ cứng bằng hình ảnh
Bước 1: Giải nén file cài đặt
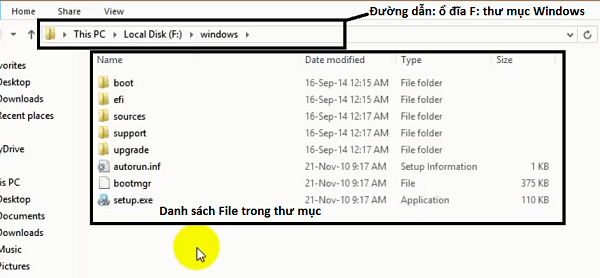
Bước 1.1: Di chuyển file .ISO cài Windows ra thư mục gốc của 1 ổ đĩa (không phải ổ C) trên máy tính.
Bước 1.2: Giải nén file .ISO ra 1 thư mục cùng tên với file cài đặt.
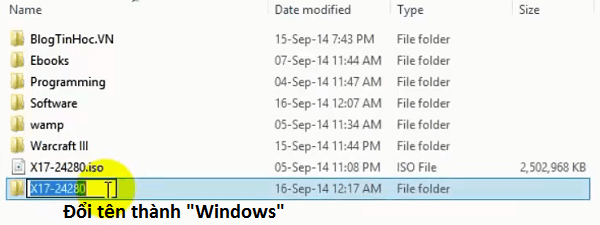
Nếu máy tính bạn cài Winrar các bận nhấp chuột phải vào file .ISO chọn Extract to “X17-24280″
Nếu máy tính bạn cài 7-Zip các bận nhấp chuột phải vào file .ISO chọn 7-Zip => Extract to “X17-24280″
Bước 1.3: Đổi tên thư mục vừa giải nén thành “windows” (hoặc tên khác nhưng các bạn phải nhớ)
Bước 1.4: Mở thư mục vừa đổi tên kiểm trang nếu số lượng file và tên file tương đối giống với hình dưới thì các bạn đã giản nén thành công, nếu không các bạn kiểm tra xem file download về có lỗi không rồi giải nén lại. Sau đó ghi nhớ tên ổ đĩa chưa thư mục và tên thư mục và giải nén. Trong trường hợp máy tính của mình là ổ đĩa F thư mục Windows
Bước 2: Khởi động Command Prompt trông chế độ Safe mode
Ở bước này thao tác trên Windows 7 và 8 sẽ khác nhau.
Cài windows mới từ máy đang chạy HĐH windows 7
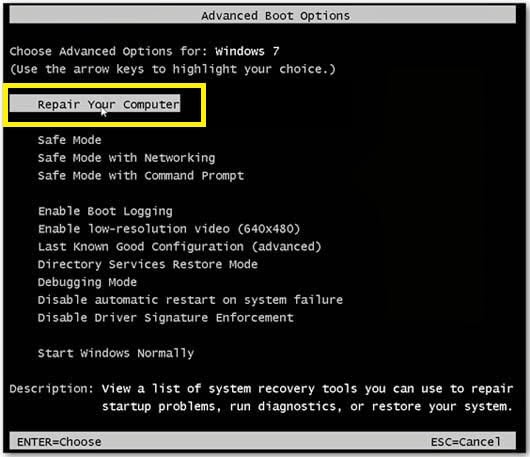
– Các bạn khởi động lại máy tính và ấn nút F8 liên tục tới khi xuất hiện màn hình đen như hình bên dưới. Sau đó các bạn dùng nút mũi tên nên xuống và nút Enter để chọn Repair Your Computer.
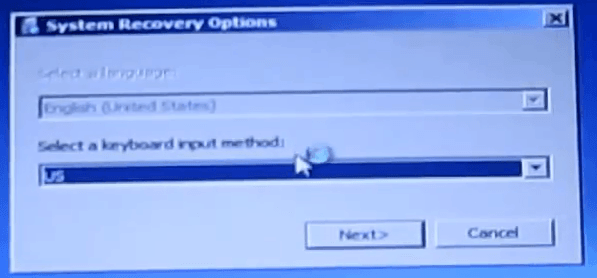
– Màn hình System Recovery Options hiển thị kêu các bạn chọn loại bàn phím dể thực hiện các bước tiếp theo. Các bạn để mặc định là US rồi nhấp vào Next
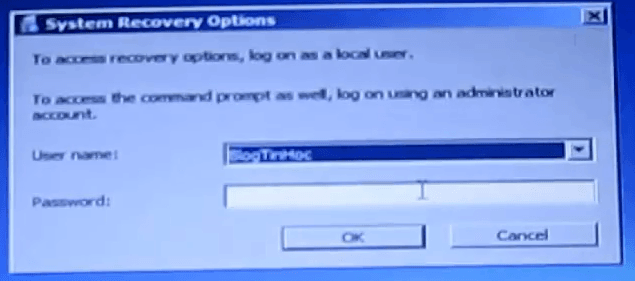
– Tiếp theo System Recovery Options lại yêu cầu bạn nhập mật khẩu cho máy tính với User mặc định của mình là BlogTinHoc, nếu máy bạn có mật khẩu thì các bạn nhập vào, nếu không có thì không cần nhập và chọn OK
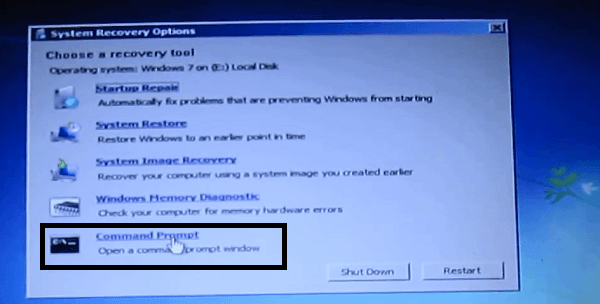
– Màn hình System Recovery Options tiếp theo các bạn chọn Command Prompt
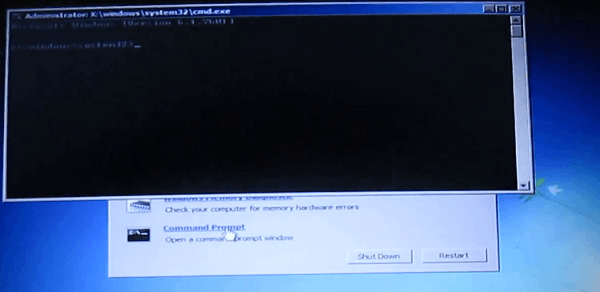
– Sau đó bạn thu được cửa sổ Command Prompt. Giờ bạn chuyển sang bước 3.
Cài windows mới từ máy đang chạy HĐH windows 8
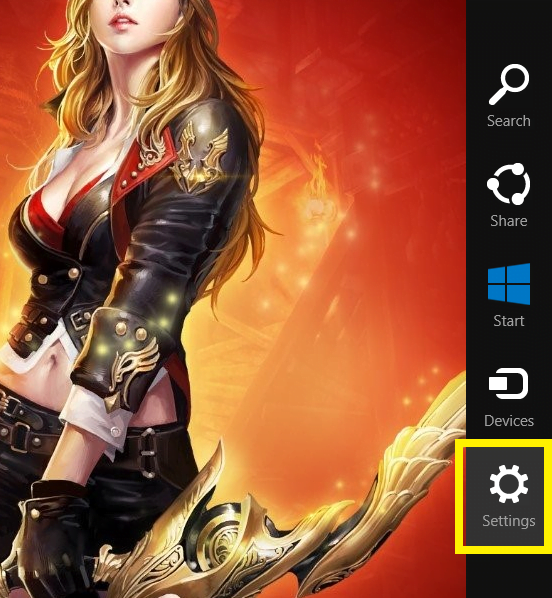
Từ màn hình Desktop các bạn di chuyển chuột góc trên phải màn hình để hiển thị thanh Menu, sau đó bạn kéo chuột xuống dưới chọn Settings trên Menu.
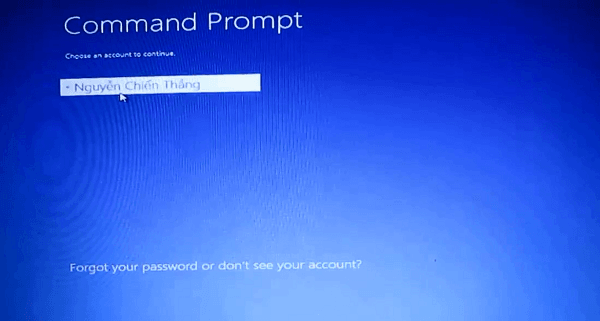
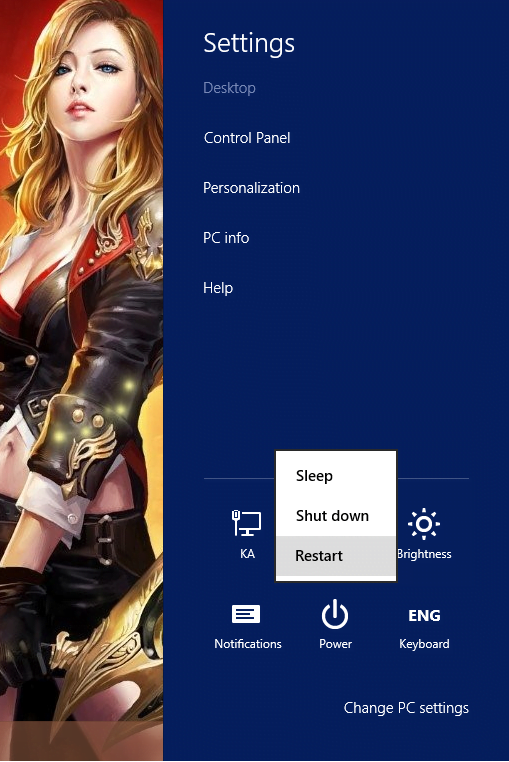
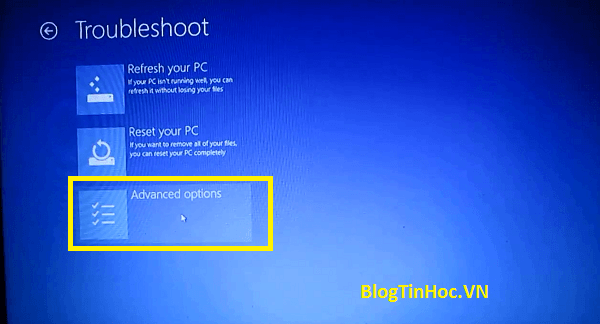
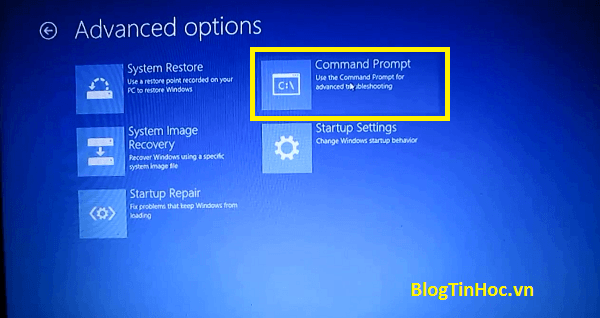
Tiếp đến các bạn nhấp chuột trái vào Power tiếp đó các bạn giữ nút Shift và nhấp chuột trái vài Restart Sau đó màn hình Please wait sẽ load khoảng 30 giây và mở lên tùy chọn Choose an option. Tại đây các bạn chọn Troubleshot -> Advanced Options -> Command Prompt. Sau đó máy tính sẽ khởi động lại và màn hình Command Prompt hiển thị lên, các bạn chọn tên Account máy tính.
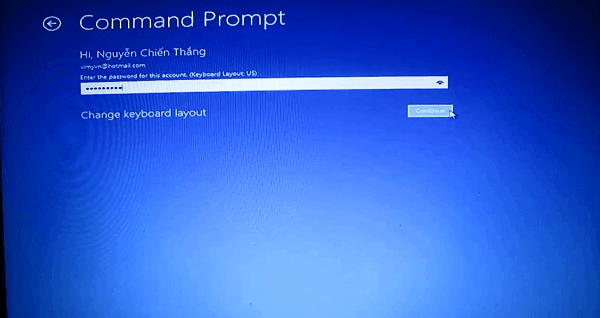
Sau đó điền mật khậu khẩu mà chọn continue
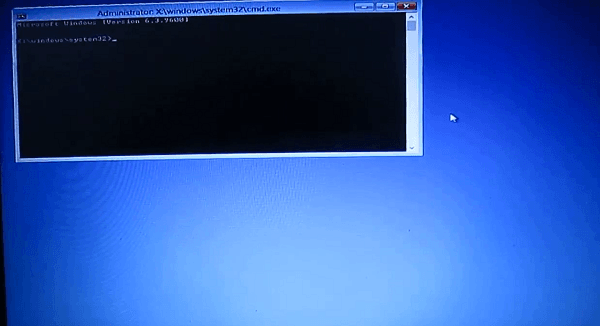
Cuối cùng màn hình Command Prompt hiển thị lên.
Bước 3: Gõ lệnh CMD chạy file cài đặt Windows
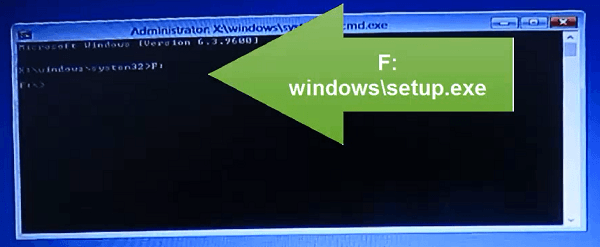
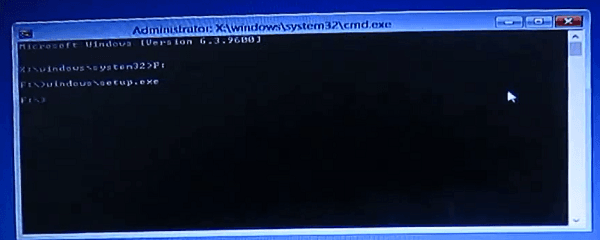
Đầu tiên các bạn nhập tên ổ đĩa ( ổ chứa thư mục giải nén file cài đặt ở bước 1) sau đó ấn Enter để di chuyển tới ổ đĩa đó. Với máy tính mình là F:
Sau đó các bạn gõ “Tên thử mục”setup.exe với máy tính mình ở bước 1 là thư mục windows nên mình sẽ gõ windowssetup.exe sau đó ấn Enter.
Sau đó màn hình cài Windows mới sẽ xuất hiện.
Lỗi khi cài win từ ổ cứng
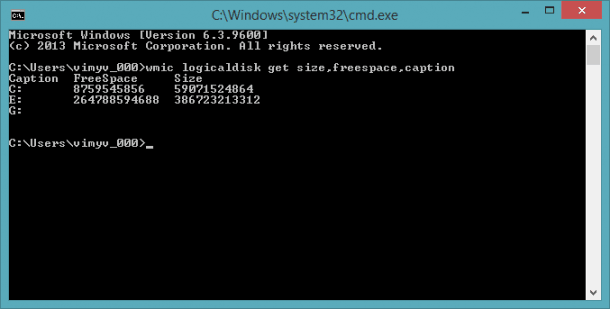
Đôi khi ở bước này các bạn có thể gặp lỗi “The system cannot find the path specified.”, lỗi này có thể là do bạn nhớ tên thư mục không đúng hoặc do ổ đĩa chứa thư mục cài win đã đổi tên ở bước này so với trong win (điều này thường xảy ra nếu các bạn phân vùng ổ đĩa). Để khắc phục đầu tiên bạn phải khởi động lại vào windows đảm bảo chắc chắn tên thư mục chính xác, và xem dung lượng ổ đĩa chứa thư mục là bao nhiêu GB, sau đó bạn làm các thao tác ở bước 2 để quay lại bước 3.
Tại đây, nếu tên thư mục mới nãy bạn điền vào sai thì bạn điền lại cho đúng, nếu tên thư mục đúng thì ta gõ lệnh “wmic logicaldisk get size,freespace,caption” vào. Lúc này sẽ có danh sách các ổ đĩa có trên máy tính, dung lượng ổ đĩa (đơn vị MB, các bạn có thể dự vào 1 GB=1024 MB để đổi dung lượng các ỗ đĩa ra GB), dựa vào dung lượng ổ đĩa bạn hãy xác định đâu là ổ đĩa chứa thư mục cài windows, nhưng nếu bạn ngại việc đổi dung lượng thì bạn hãy thực hiện bước 3 với lần lượt các ổ đĩa tới khi thành công thì thôi (mỗi máy tính thường có 2-3 ổ đĩa nên làm cũng khá nhanh, riêng ổ đĩa C là ổ đĩa chứa HĐH không thể bị đổi tên nên ta có thể xacs định được ổ đĩa này)
Bây giờ bạn có thể thực hiện các thao tác cài đặt tiếp theo y như khi cài bằng USB hoặc CD. Bây giờ các bạn làm theo bài viết hướng dẫn cài Windows 8.1 hoặc hướng dẫn cài windows 7
Tối nay nóng quá đến 2h sáng rồi mà vẫn không ngủ được vào tắm cái lại nhớ lại chuyện hồi nhỏ. Hồi đó nhà tôi nghèo lắm, không có quạt điện như bây giờ, cứ mỗi tối mùa hè nóng nực thì tôi và cả nhà thường ra hiên ngủ, có bữa thì ra sân, cả nhà có chiếc quạt giấy nhỏ mà mẹ tôi ưu tiên quạt cho tôi và cháu (con anh cả) tôi.
Ảnh minh họa
Tuy vậy, tôi chỉ được quạt trước khi đi ngủ sau đó thì cả nhà ai cũng mệt nên ngủ thiếp đi hết, chỉ có cháu tôi thỉnh thoảng khóc làm mẹ tôi phải à ơi ru nó ngủ tiếp. Tính tôi không chịu được nóng, nên nửa đêm tôi tỉnh giấc lại chạy ra chiếc giếng khoan nhỏ, hì hục bơm nước, rồi uống, rồi dội, hì hà, cảm giác lúc đó dễ chịu làm sao, những ngụm nước mát rượi, trong lành tan chảy trong miệng rồi xuống bụng đi qua cổ họng làm dịu cơn khát, nước dội bên ngoài mát rượi làn da,...Bây giờ hiện đại có đá nền(gạch hoa), có quạt điện, máy bơm nước, tôi lại thèm cái cảm giác ngày ấy, không rõ nhưng chắc có lẽ không bao giờ quay về nữa.
Chương trình hẹn giờ tắt máy được mình viết bằng bat file.
Ai hay ngủ quên thì tải về dùng nha, siêu nhẹ, khi
chạy chỉ tốn <500kb ram vì chỉ có thêm 1 schedule vào process so sánh
với các sản phẩm cùng loại thì thật nổi bật.
Chức năng: shutdown, restart, log off, and so on, định viết thêm cái hibernate mà thấy không cần thiết lắm :)
Chia sẻ với các bạn phần mềm cắt ghép mp3 nhỏ gọn nhất và cực chất nhất mình từng sử dụng, dung lượng chỉ vỏn vẹn 133kb nhưng hoạt động chả khác gì các phần mềm 20-30mb, đặc biệt nó cắt direct không cần thông qua giải mã nên tốc độ siêu nhanh và giữ nguyên chất lượng âm thanh gốc, đặc biệt nó không cần cài đặt mà chạy ngay.
Đó là phần mềm mp3DirectCut, của tác giả Martin Pesch.
Hướng dẫn này dành cho các bạn sử dụng google drive(mình khuyên nên dùng drive này vì nó free nhiều 15gb, download max speed)
Ví dụ mình có file sau:
Bước 1: Các bạn vào google drive, tìm đến tài liệu cần nhúng, chọn chia sẻ. Bạn sẽ thấy tương tự trong hình dưới
Mục Đã bật chia sẻ liên kết bạn chọn bất kỳ ai có liên kết đều có thể xem
Bạn nhấn vào mục nhận liên kết có thể chia sẻ được, bạn sẽ nhận được một liên kết như trong hình
Bước 2: Bạn tạo một bài viết mới sau đó chuyển sang tab html, rồi copy đoạn code sau vào
<iframesrc="đường dẫn đến tập tin/preview"height="độ cao khung nhìn"width="độ rộng khung nhìn"></iframe >
Bước 3: Thay phần "đường dẫn đến tập tin" bằng đường dẫn mà bạn nhận được ở bước 1, lưu ý thay chữ "view?usp=sharing" bằng preview, thay "độ cao khung nhìn" và "độ rộng khung nhìn" bằng các giá trị sao cho phù hợp với blog của bạn. Bước 4: Code hoàn chỉnh đối với ví dụ của tôi là:
Nhiều bạn khi cài song song windows/ linux thì mặc định linux sẽ được boot trước, nếu muốn khởi động vào windows thì phải chọn ở trên bàn phím, việc làm này làm mất thời gian của nhiều bạn vốn chỉ xem linux là hdh để vooc và windows vẫn là hdh chính sử dụng, hướng dẫn sau sẽ giúp bạn đặt windows là hdh mặc định khi khởi động.
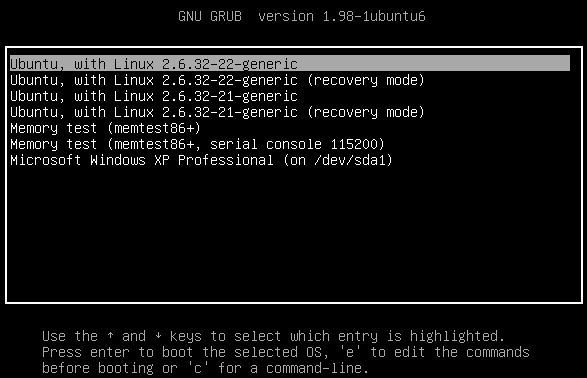
Khi khởi động máy bạn sẽ gặp màn hình menu đầu tiên như sau:
Máy sẽ cho bạn thời gian 10 giây để chọn boot vào đâu, nếu bạn không chọn gì cả thì mặc định là dòng trên cùng (Ubuntu), nếu bạn muốn boot vào Windows thì bạn phải chọn dòng cuối cùng. Vậy sẽ hơi bất tiện phải không nào.
Có lẽ hiện nay các bạn đều đã dùng bản Ubuntu mới 10.04 (Lucid) hoặc 9.10 (Karmic), kể từ bản Karmic Ubuntu sử dụng Grub2.
Các bạn mở Terminal, và mở tập tin /etc/default/grub bằng lệnh: sudo gedit /etc/default/grub
Bạn tìm đến dòng GRUB_DEFAULT=0 (thường là dòng thứ 4), đây là dòng quy định mục nào trên menu sẽ được boot, và mặc định là dòng 0, tức dòng đầu tiên. Bạn lưu ý là thứ tự bắt đầu từ 0 chứ không phải 1.
Trở lại hình trên, bạn hãy đếm từ trên xuống bắt đầu từ 0, dòng của Windows sẽ là dòng 6 (tức 7 nếu đếm từ 1).
Vậy bạn hãy sửa GRUB_DEFAULT=0 lại thành GRUB_DEFAULT=6.
Bạn lưu lại và thóat gedit. Sau đó thực thi lệnh sau trên Terminal: sudo update-grub.
Bạn khởi động lại máy, bạn sẽ thấy dòng sáng mặc định sẽ hiện ở dòng của Windows chứ không phải dòng đầu tiên của Ubuntu như ban đầu và máy sẽ boot vào Windows nếu bạn không lựa chọn gì cả.
Nếu bạn cảm thấy thời gian 10 là hơi dài thì bạn có thể sửa lại tại dòng GRUB_TIMEOUT=10.
Nếu bạn dòng bản Ubuntu cũ trước bản Karmic thì bạn phải sửa tập tin /boot/grub/menu.lst và thay vì sửa dòng GRUB_DEFAULT=0 thì bạn tìm đến dòng default 0.
Ngoài ra bạn có thể sửa đổi rất nhiều thứ từ màu chữ, font chữ đến hình nền, các bạn có thể xem hướng dẫn tại https://help.ubuntu.com/community/Grub2.
Hy vọng giúp được các bạn!
Chức năng UAC là rất hữu dụng, tuy vậy khi bạn dùng một phần mềm can thiệp hệ thống liên tục thì cảnh báo UAC lại gây ra sự phiền toái nhất định, windows cho phép bạn tắt UAC nhưng là tắt đối với tất cả các chương trình, điều này gây nguy hiểm cho máy tính chúng ta, 4 cách sau giúp bạn dễ dàng tắt UAC đối với một số chương trình (không phải tắt đối với tất cả).
Whether you like the User Account Control (UAC) feature in Windows Vista, 7 and 8 or not, the average computer user should always have it enabled. This is because there’s no doubt UAC is capable of blocking some actions by malware such as adding itself to global startup, dropping or modifying files located in Windows, installing rogue software processes and etc. There are certainly weaknesses in UAC, and there are ways to bypass UAC restrictions on a system, but not all malware is capable of doing that which is where UAC can work.
Unfortunately the effectiveness of UAC will probably diminish over time for many users because they mostly just end up pressing Yes to allow a program access without even looking at what is asking to run, because they’re presented with the prompt so often. Power users will no doubt find UAC extremely annoying and it’s the first thing that many of us disable after installing Windows. We usually have to keep UAC enabled on some of our test systems to simulate a normal user’s computer when doing research or testing software.
If you keep UAC enabled it can be quite annoying when you use a piece of software often and every time you run it, the UAC prompt appears. The program is perfectly safe, you’ve run it several times, and yet Windows keeps asking. Thankfully, there are ways around this problem to stop the UAC prompt from appearing for programs you specify and trust, here’s a selection of ways you can do it.
1. UAC Pass
UAC Pass is a small and portable executable that creates a UAC promptless shortcut on your desktop with drag and drop. When you double click the shortcut, it will launch your program and won’t popup the UAC prompt. This is made possible by adding the application to the Windows Task Scheduler automatically and then the shortcut simply starts the task with high privileges.
There are some preset options in UAC Pass that allow you to create a shortcut for different scenarios such as a USB drive, a startup entry or the desktop, and can pin to the Start Menu and Taskbar. You can also create a scheduled task that is started with Windows, allow multiple instances, create a batch file, force language and relative paths. For most situations the default preset should work just fine though.
To create the UAC bypass shortcut, all you have to do is drop a program or shortcut onto the window, and it will automatically create a scheduled task and then create the shortcut in the chosen location which will launch the task. To delete the shortcut, you can drag and drop it onto UAC Pass again to remove the program from Windows Task Scheduler and then manually delete the shortcut. Alternatively, just delete the shortcut and then go to the Windows Task Scheduler and delete the task. UAC Pass works in Windows Vista, Windows 7 and 8 32-bit and 64-bit. Download UAC Pass
2. UAC Trust Shortcut
UAC Trust Shortcut allows you to disable User Account Control for a specific application, by defining a trusted shortcut. This program works slightly differently to UAC Pass because it doesn’t create a scheduled task and uses its own service to elevate the program. After installation, a UAC Trust Shortcut Tray Manager will be added to Windows startup which provides a convenient way for you to start the service and trusted shortcut creator.
To create a trusted shortcut, right click on the tray icon and select “Open UAC Trust Shortcut 1.0″. A window will appear where you can add the name of the program that you want to white list, browse for the program and click the Add now link. The trusted shortcut will be added to the Desktop and you can now run the program from the trusted shortcut without getting the UAC prompt. There is actually an additional step which you must perform first or else the trusted shortcut will always prompt the User Account Control warning.
You need to manually start the background service (tracer.exe) from the UAC Trust Shortcut Tray Manager (which requires UAC elevation) whenever you restart, or log off from your Windows session. You can launch as many trusted shortcuts you want without getting the UAC prompt while logged in. UAC Trust Shortcut doesn’t support command line arguments and doesn’t work with batch files. It works on Windows 7 32-bit and 64-bit. Make sure you download the correct version or else the setup will fail to install. Download UAC Trust Shortcut 32-bit | 64-bit
3. ElevatedShortcut
ElevatedShortcut is a program that’s quite similar in it’s operation to UAC Pass and allows you to create a Windows shortcut to elevate the privilege level of the program you’re trying to run so it doesn’t need the UAC prompt to appear. A Scheduled task is created with the “Run with highest privileges” option set, and the shortcut calls and runs the task.
ElevatedShortcut is a portable program and has separate version for Windows Vista and 7, and another for Windows 8 inside the zip file. Simply run the relevant executable and it will popup the main window where you have the choice of creating a new shortcut, modifying an existing shortcut or removing one you created previously. There’s also an option in Settings to add an entry into the Explorer context menu.
Clicking on a new shortcut will popup a new window where you locate the executable file, supply any optional command line arguments and a working directory if required. Then locate the folder where you want to place the shortcut and click the OK button. The Remove shortcut button will show you which scheduled tasks have been previously created along with the accompanying shortcuts, simply check the box to remove what you don;t want and click the button. ElevatedShortcut
4. The Task Scheduler Trick
If you’re having issues with any of the tools that use the Task Scheduler shortcut to elevate the application, or would simply like to know how it’s done, you can always create a scheduled task yourself. It’s not difficult and only takes a minute or two to setup. Here are the steps on how to make a program run under the Task Scheduler with the highest privileges to bypass the UAC prompt.
1. Click the Start button and type Task Scheduler on the search programs and files bar and hit enter. Or go to Control Panel -> Administrative Tools -> Task Scheduler. 2. Click Action from the menu and select Create Task. Fill in the Name and Description boxes and then MAKE SURE to check the “Run with highest privileges” check box. This is the option which elevates the task to bypass the UAC prompt.
3. Go to the Actions tab and click the New button. 4. Make sure that “Start a program” option is selected and browse for the program that you want to run without a UAC prompt and click OK. Optionally you can also specify any command line arguments if required.
5. Now go to Settings tab and make sure that “Allow task to be run on demand” is selected which should already be enabled. Click the OK button to create the task and you should see the task being added to the Task Scheduler Library.
6. You can either manually run the program directly from Task Scheduler by right clicking on the task and select Run, or create a shortcut which is very useful when you want to put it in startup or just double click to open it quickly. To create a shortcut, right click on the Desktop and select New -> Shortcut. Type the following into the location box and click Next.
schtasks /run /TN "{Name of task}"
You will obviously need to change the task name in double quotes to the name of the task which you’ve used in step 2. Any name can be used for the shortcut and then click the Finish button. Whenever you need to run the program without the annoying UAC prompt, simply run the shortcut which has been created. You can even be place the shortcut in the Startup folder so that it runs with highest privileges without prompting you to allow the following program to make changes to the computer.
If you totally disable User Account Control, then you don’t need to use these methods, but it is good to know that there is a way to bypass the UAC restriction using different ways if needed. If you have UAC enabled and would like to keep it that way, or would like to allow another user access to a safe file without needing a prompt, then these tips could be useful if you need to run certain programs that require elevation when they startup.
 RSS Feed
 Twitter


 15:57
15:57
 Unknown


 Sau đó màn hình Please wait sẽ load khoảng 30 giây và mở lên tùy chọn Choose an option. Tại đây các bạn chọn Troubleshot -> Advanced Options -> Command Prompt.
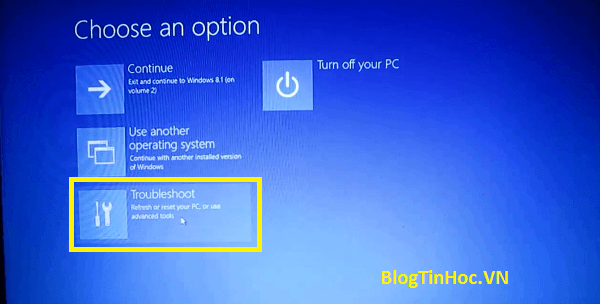
 Sau đó máy tính sẽ khởi động lại và màn hình Command Prompt hiển thị lên, các bạn chọn tên Account máy tính.